
I have this old TP Link router that I thought I could tech some tricks. Unfortunately I flashed it with an image that contained a broken configuration and I successfully locked myself out completely from the all network access to it.
Newer models support a failsafe method in which very early on in the boot process the router might look for a specific image via TFTP. This model (at least this revision) didn’t let me grasp that straw though.
Serial Console to the rescue
OpenWrt’s wiki provides extremely good documentation on a seemlingly endless list of devices. Of course there is also a long and detailed entry for the TL-WR1043ND model. Near the bottom of the wiki entry it mentions UART ports that lie dormant on the PCB. All that is needed is to “crack” open the router and to connect 3 wires to the right places.
I am extremely unexperienced when it comes to soldering, but adding three wires in place is a task that I can (barely) get done.
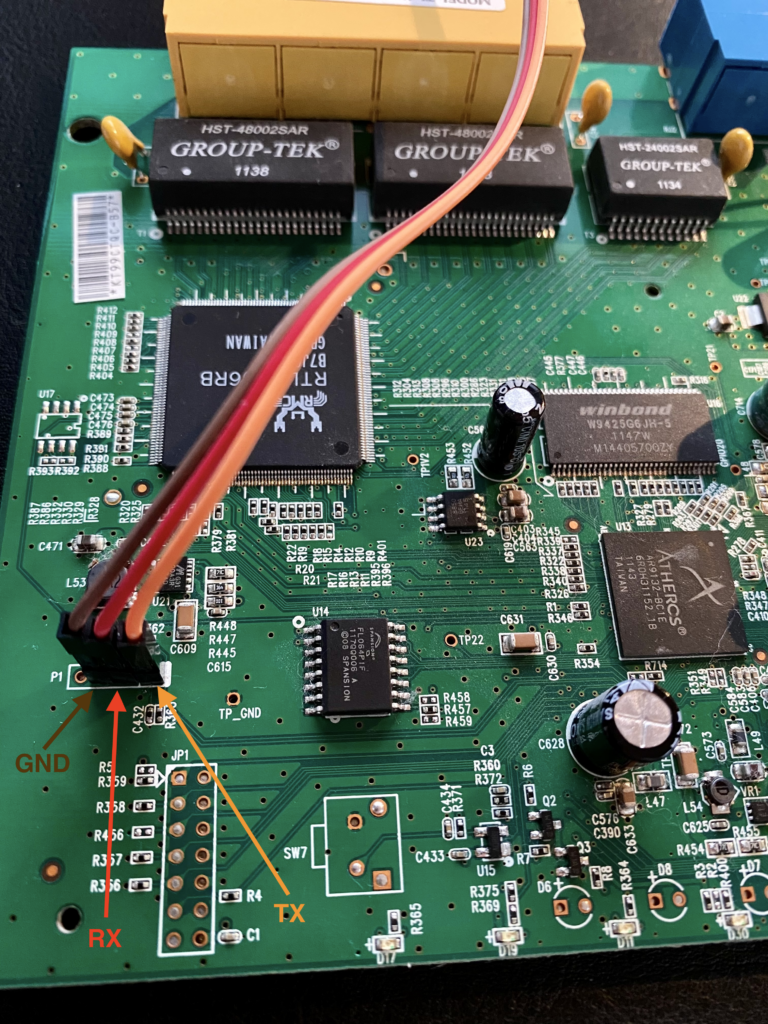
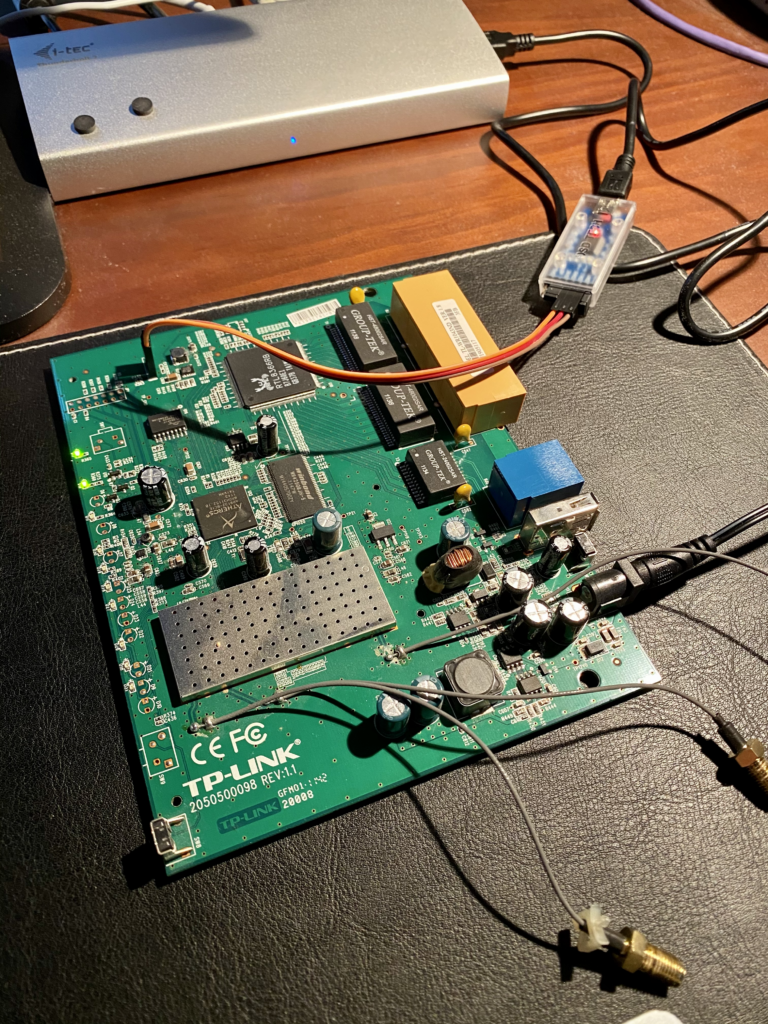
On the other end of my wires I connected a USB to serial adapter, to be more precise I own a FT232RL that can be bought for less than 10 bucks on AMAZON (or Ali Express if you have enough time to wait for it to be shipped in from China). The most important thing when connecting the FTDI to the board is the voltage. The board runs on 3.3V and it is of utmost importance to adjust the FTDI to that exact voltage, as otherwise the circuit will fry. Other than that the RX port on the board needs to be hooked up with the TX port of the FTDI and the TX port of the board goes into the RX of the FTDI. When ready my setup looked like this:
Connect to the console
I am sure there are plenty of programs out there that allow connecting the serial console to a terminal. With OSX there is no need to install anything, as you just have to open a terminal and use the screen command. The first thing though is to find out the name of the device.
andreas@AnDeSu16 ➜  ~ ls -lah /dev/tty.*
crw-rw-rw-  1 root  wheel   18,   0 Dec 10 14:48 /dev/tty.Bluetooth-Incoming-Port
crw-rw-rw-  1 root  wheel   18,   2 Dec 10 14:48 /dev/tty.JabraEVOLVE65-SPPDev
crw-rw-rw-  1 root  wheel   18,   4 Jan  8 14:38 /dev/tty.usbserial-AB0KGVU8
As shown above the device we want to connect to it is listed as last entry. Now all we need to do is to use the screen command with the device name and the correct baud rate. In our case the router uses 115200 baud and so we adhere…
andreas@AnDeSu16 ➜ ~ screen /dev/tty.usbserial-AB0KGVU8 115200
Last but not least comes the moment of truth and we switch on our router…
U-Boot 1.1.4 (Nov 17 2009 - 11:56:26)

AP83 (ar9100) U-boot 0.0.11
DRAM:
sri
32 MB
id read 0x100000ff
flash size 8MB, sector count = 128
Flash:  8 MB
Using default environment

In:    serial
Out:   serial
Err:   serial
Net:   ag7100_enet_initialize...
No valid address in Flash. Using fixed address
: cfg1 0xf cfg2 0x7114
eth0: 00:03:7f:09:0b:ad
eth0 up
eth0
Autobooting in 1 seconds## Booting image at bf020000 ...
   Uncompressing Kernel Image ... OK

Starting kernel ...
Perfect. Everything after that is a piece of cake, as we get into a root console and can do whatever we like with it. Well, obviously we use it to flash a working image that allows us remote access again 😉