
What we want to do is to create an 802.11s mesh wireless lan. We will use OpenWrt (version 19.07) and B.A.T.M.A.N. (Better Approach To Mobile Adhoc Networking) to accomplish our goal. We will play it easy first and start with 2 nodes:
- TP-Link Archer C7 AC1750 (~60€)
- Netgear EX3700 / EX3800 (~30€)
The technical terms under which we address the 2 above nodes require some quick clarification. A device that provides a gateway into another network, like an uplink to the internet (i.e. via cable connection), can be called an exit point in a mesh setup. A device that enables clients such as mobile phones and laptops to connect to the mesh network can be called entry point in a mesh setup.
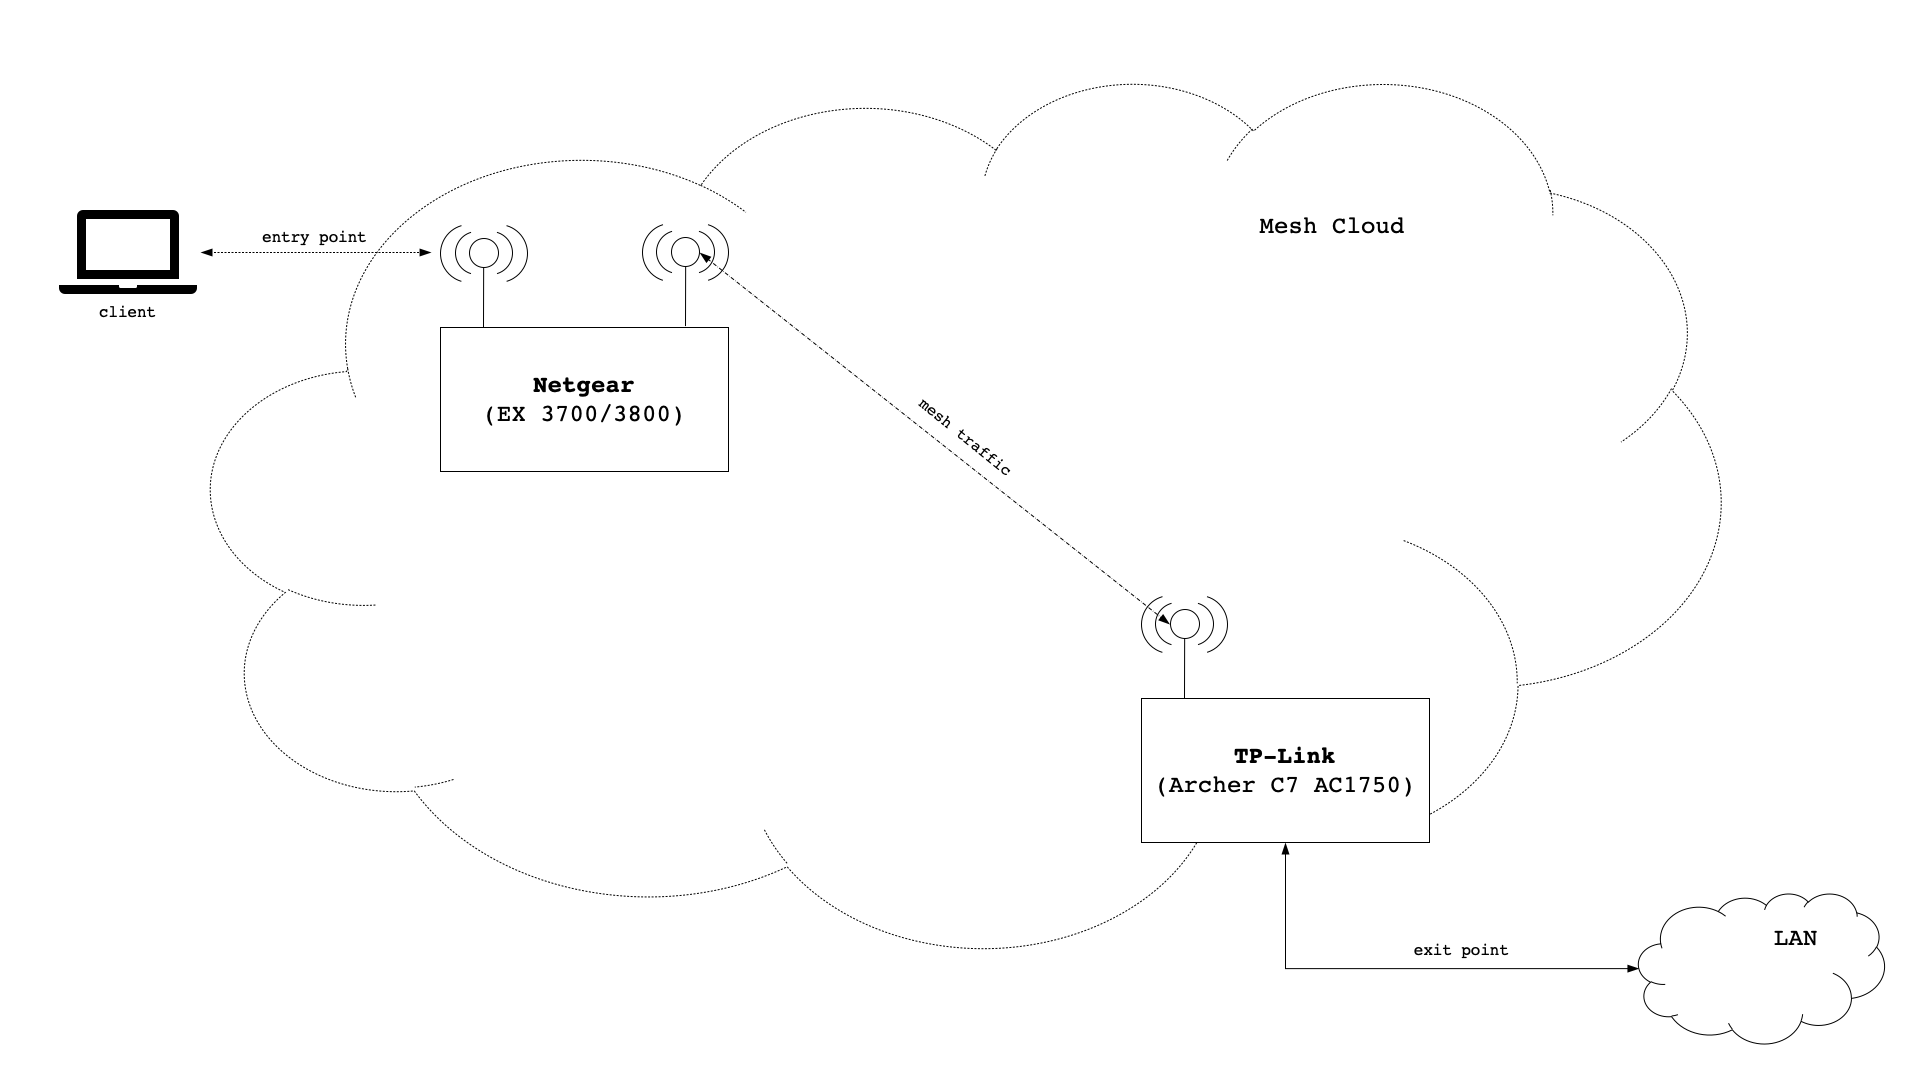
Having said that, the Netgear device will be mesh node with no connection to any other networks. It will only have the ability to reach other networks by going through the mesh network it is a part of. It will pose as a wireless access point and provide users with the ability to connect to “the” network. Hence, the Netgear device is a plain entry point in our mesh setup.
The TP-Link device has two roles! It will be a mesh node that, while being connected to other mesh nodes, will pose as a wireless access point. The TP-Link device will be an entry point in our mesh setup. At the same time the TP-Link device will have a connection to other networks than the mesh network. It will pose as a gateway out of the mesh network into other networks. Therefore, the TP-Link device will be an exit point as well.
Assumptions / Scope
This post assumes that you can manage to install OpenWrt onto the TP-Link and the Netgear device on your own. Also, this post doesn’t cover initial network setup for the TP-Link device in terms of WAN interface, DNS Server, DHCP Server or Firewall. It is assumed you know your way around the basic workings of how computer networks are coming together.
Network Setup
We will use the network 192.168.28.0/24 and setup the following configuration:
| Device | Config Key | Config Value |
|---|---|---|
| TP-Link | ipaddr | 192.168.28.1 |
| gateway | – | |
| SSID | – | |
| Netgear | ipaddr | 192.168.28.3 |
| gateway | 192.168.28.1 | |
| SSID | 24TEST |
TP-Link Archer C7 AC1750
While this device could of course offer wifi, in our initial setup we decide not to do that at first. The reason is that it might help understand that wifi communication for mesh and wifi communication for access points (client devices) are totally separate from on another. Actually, different radios can be used all together.
Let’s start by figuring out how many radios our device has and which frequencies are supported:
root@AC1750:~# iw phy | grep 'MHz \['
			* 2412 MHz [1] (24.0 dBm)
			* 2417 MHz [2] (24.0 dBm)
			* 2422 MHz [3] (24.0 dBm)
			* 2427 MHz [4] (24.0 dBm)
			* 2432 MHz [5] (24.0 dBm)
			* 2437 MHz [6] (24.0 dBm)
			* 2442 MHz [7] (24.0 dBm)
			* 2447 MHz [8] (24.0 dBm)
			* 2452 MHz [9] (24.0 dBm)
			* 2457 MHz [10] (24.0 dBm)
			* 2462 MHz [11] (24.0 dBm)
			* 2467 MHz [12] (disabled)
			* 2472 MHz [13] (disabled)
			* 2484 MHz [14] (disabled)
			* 5180 MHz [36] (23.0 dBm)
			* 5200 MHz [40] (23.0 dBm)
			* 5220 MHz [44] (23.0 dBm)
			* 5240 MHz [48] (23.0 dBm)
			* 5260 MHz [52] (23.0 dBm) (radar detection)
			* 5280 MHz [56] (23.0 dBm) (radar detection)
			* 5300 MHz [60] (23.0 dBm) (radar detection)
			* 5320 MHz [64] (23.0 dBm) (radar detection)
			* 5500 MHz [100] (23.0 dBm) (radar detection)
			* 5520 MHz [104] (23.0 dBm) (radar detection)
			* 5540 MHz [108] (23.0 dBm) (radar detection)
			* 5560 MHz [112] (23.0 dBm) (radar detection)
			* 5580 MHz [116] (23.0 dBm) (radar detection)
			* 5600 MHz [120] (23.0 dBm) (radar detection)
			* 5620 MHz [124] (23.0 dBm) (radar detection)
			* 5640 MHz [128] (23.0 dBm) (radar detection)
			* 5660 MHz [132] (23.0 dBm) (radar detection)
			* 5680 MHz [136] (23.0 dBm) (radar detection)
			* 5700 MHz [140] (23.0 dBm) (radar detection)
			* 5720 MHz [144] (23.0 dBm) (radar detection)
			* 5745 MHz [149] (30.0 dBm)
			* 5765 MHz [153] (30.0 dBm)
			* 5785 MHz [157] (30.0 dBm)
			* 5805 MHz [161] (30.0 dBm)
			* 5825 MHz [165] (30.0 dBm)
			* 5845 MHz [169] (disabled)
			* 5865 MHz [173] (disabled)
Well, we kind of knew upfront that the device has both a 2.4 GHz and a 5 GHz radio, but now we can explicitly see all the frequencies and channels that are supported by the device. What we need to check next is if (and how) the device supports 802.11s:
root@AC1750:~# iw phy | grep -i mesh
		 * mesh point
		 * #{ managed } <= 2048, #{ AP, mesh point } <= 8, #{ P2P-client, P2P-GO } <= 1, #{ IBSS } <= 1,
		 * mesh point
		 * #{ AP, mesh point } <= 8, #{ managed } <= 1,
Looks good. Next step is to install the B.A.T.M.A.N. kernel module as well as the full version of batctl.
root@AC1750:~# opkg update
root@AC1750:~# opkg install kmod-batman-adv
root@AC1750:~# opkg install batctl-full
We also need to install wpad-mesh, but it conflicts with wpad-basic – so we need to send that one packing upfront.
root@AC1750:~# opkg remove wpad-basic
root@AC1750:~# opkg install wpad-mesh-openssl
Wireless Config
We are going to create a mesh network with the name MyMesh and encrypt it with psk2 and ccmp. We will put our mesh network on our 5 GHz radio and create an internal network device called nwi_mesh0. We need to edit the file /etc/config/wireless and insert the following:
config wifi-iface 'wifinetmesh0'
        option device 'radio5'
        option ifname 'mesh0'
        option network 'nwi_mesh0'
        option mode 'mesh'
        option mesh_fwding '0'
        option mesh_id 'MyMesh'
        option encryption 'psk2+ccmp'
        option key 'mysecretpassword'
We have to make sure that our device name (line 2) matches that of our 5 GHz radio. In a fresh installation of OpenWrt radios are often numbered through starting from zero (radio0, radio1, etc.). I like to rename my radios to radio24 (2.4 GHz) and radio5 (5 GHz) for better readability. Anyway, the other thing that is important is the name of our internal network device (line 4) which we will create later via /etc/config/network. All other options in the configuration stanza above must be the same on every other mesh node in our mesh network! There are 3 other settings that also must be the same across all mesh nodes in the mesh network: wireless protocol, radio frequency (channel) and channel width. Below are settings for channel 48 (5240 MHz), wireless 802.11a and an 80MHz throughput.
config wifi-device 'radio5'
        option type 'mac80211'
        option channel '48'
        option hwmode '11a'
        option htmode 'VHT80'
        option path 'pci0000:00/0000:00:00.0'
Network Config
We need to create two interfaces and bridge them with our local area network. The first interface we need to specify is bat0, which we need to adhere to the batman advanced protocol (batadv). The second interface we need is nwi_mesh0, as this is the exact name we gave in the wireless config earlier on. That one will adhere to the batman advanced hard interface protocol (batadv_hardif). Also, because B.A.T.M.A.N. is a layer 2 protocol, we should increase the MTU above the typical value of 1500 so that we can avoid packet fragmentation. We add the following stanza in the file /etc/config/network.
config interface 'nwi_mesh0'
        option proto 'batadv_hardif'
        option mtu '2304'
        option master 'bat0'

config interface 'bat0'
        option proto 'batadv'
Last but not least we need to bridge the bat0 interface with our local area network by adding it to the interface definition of lan. We change the following line in /etc/config/network.
config interface 'lan'
        option stp '1'
        option type 'bridge'
        option ifname 'eth0.1 bat0'
        option proto 'static'
        option ipaddr '192.168.28.1'
        option netmask '255.255.255.0'
        option delegate '0'
That’s it for the TP-Link device. We should reboot to make sure all changes will be applied.
Netgear EX3700 / EX3800
Mostly we will apply the exact same setup, but with two differences:
- the device will not be connected to the internet, so we will need to copy the packages onto the device via scp
- the device will also provide a wireless access point for client devices to connect to it
Let’s start with checking the preconditions. Without showing lengthy console dumps to prove it, it is safe to say that this device also supports 802.11s as well as both a 2.4 GHz and a 5 GHz radio. On the 5 GHz radio it supports one less channel than the TP-Link device (channel 144 is missing), but other than than things look pretty compatible.
Copy & Install packages
For the packages needed, there are some dependencies that we need to supply as well. We need to copy the following packages onto the Netgear device (i.e. via scp):
batctl-full_2019.2-3_mipsel_24kc.ipk
kmod-batman-adv_4.14.171+2019.2-5_mipsel_24kc.ipk
kmod-cfg80211_4.14.171+4.19.98-1-1_mipsel_24kc.ipk
kmod-crypto-crc32c_4.14.171-1_mipsel_24kc.ipk
kmod-crypto-hash_4.14.171-1_mipsel_24kc.ipk
kmod-lib-crc16_4.14.171-1_mipsel_24kc.ipk
kmod-lib-crc32c_4.14.171-1_mipsel_24kc.ipk
libopenssl1.1_1.1.1d-2_mipsel_24kc.ipk
librt_1.1.24-2_mipsel_24kc.ipk
wpad-mesh-openssl_2019-08-08-ca8c2bd2-2_mipsel_24kc.ipk
Next we follow the exact same installation procedure as for the TP-Link device. One thing we should watch out for is flash memory… the Netgear device doesn’t offer much ‘free disk space’, so it might be wise to copy, install and delete one package as a time.
Wireless config
We actually use the exact same wireless config stanza as for the TP-Link device. As far as the radio is concerned, we have to make sure that wireless protocol, radio frequency (channel) and channel width match with the settings for the TP-Link device.
In addition we want our Netgear device to be a wireless access point. We define a new wireless access point named , so we need to define 24TEST for our 2.4 GHz radio. Note that what happens on the 2.4 GHz radio and the access point 24TEST have nothing to do with our mesh network. Both configurations are totally separate from one another. The interesting part of 24TEST though is line 21, which defines the network interface to the wireless access point.
config wifi-device 'radio5'
        option type 'mac80211'
        option channel '48'
        option hwmode '11a'
        option path 'pci0000:00/0000:00:00.0/0000:01:00.0'
        option htmode 'VHT80'

config wifi-device 'radio24'
        option type 'mac80211'
        option channel '11'
        option hwmode '11g'
        option path 'platform/10180000.wmac'
        option htmode 'HT40'

config wifi-iface 'wifinet24test'
        option device 'radio24'
        option mode 'ap'
        option key 'anothersecretpassword'
        option encryption 'psk2'
        option ssid '24TEST'
        option network 'lan'

config wifi-iface 'wifinetmesh0'
        option device 'radio5'
        option ifname 'mesh0'
        option network 'nwi_mesh0'
        option mode 'mesh'
        option mesh_fwding '0'
        option mesh_id 'MyMesh'
        option encryption 'psk2+ccmp'
        option key 'mysecretpassword'
Network Config
Again, we do the exact same things as for the TP-Link device in /etc/config/network.
config interface 'nwi_mesh0'
        option proto 'batadv_hardif'
        option mtu '2304'
        option master 'bat0'

config interface 'bat0'
        option proto 'batadv'
Where things look a little bit different, is the definition of the local area network (lan) in /etc/config/network. Of course we have a different IP address (line 6), but we also must declare the TP-Link device as gateway (line 8) and dns server (line 10).
config interface 'lan'
        option stp '1'
        option type 'bridge'
        option ifname 'eth0 bat0'
        option proto 'static'
        option ipaddr '192.168.28.3'
        option netmask '255.255.255.0'
        option gateway '192.168.28.1'
        option delegate '0'
        list dns '192.168.28.1'
Putting things up for a test (layer 2)
B.A.T.M.A.N. is a layer 2 protocol, which means there is a bunch of stuff that we can do without an IP address. First, we can log in to either device and the first thing we should make sure is that the mesh devices mesh0 and bat0 are up and running:
root@EX3700:~# ip link
1: lo: <LOOPBACK,UP,LOWER_UP> mtu 65536 qdisc noqueue state UNKNOWN qlen 1000
    link/loopback 00:00:00:00:00:00 brd 00:00:00:00:00:00
2: eth0: <BROADCAST,MULTICAST,UP,LOWER_UP> mtu 1500 qdisc fq_codel master br-lan state UNKNOWN qlen 1000
    link/ether 3c:37:86:60:f7:1f brd ff:ff:ff:ff:ff:ff
5: br-lan: <BROADCAST,MULTICAST,UP,LOWER_UP> mtu 1500 qdisc noqueue state UP qlen 1000
    link/ether 3c:37:86:60:f7:1f brd ff:ff:ff:ff:ff:ff
6: mesh0: <BROADCAST,MULTICAST,UP,LOWER_UP> mtu 2304 qdisc noqueue master bat0 state UP qlen 1000
    link/ether 3c:37:86:60:f7:1e brd ff:ff:ff:ff:ff:ff
7: bat0: <BROADCAST,MULTICAST,UP,LOWER_UP> mtu 1500 qdisc noqueue master br-lan state UNKNOWN qlen 1000
    link/ether 96:e1:f8:8e:fc:d7 brd ff:ff:ff:ff:ff:ff
8: wlan1: <BROADCAST,MULTICAST,UP,LOWER_UP> mtu 1500 qdisc mq master br-lan state UP qlen 1000
    link/ether 3c:37:86:60:f7:1f brd ff:ff:ff:ff:ff:ff
9: wlan0-1: <BROADCAST,MULTICAST,UP,LOWER_UP> mtu 1500 qdisc noqueue master br-lan state UP qlen 1000
    link/ether 3e:37:86:60:f7:1e brd ff:ff:ff:ff:ff:ff
Next we should make sure that the nodes can find each other. If the following command returns nothing, there is probably a typo in the config, otherwise you should see this:
root@EX3700:~# iw dev mesh0 station dump
Station b0:be:76:e9:90:ab (on mesh0)
	inactive time:	0 ms
	rx bytes:	12437433
	rx packets:	141145
	tx bytes:	58226
	tx packets:	363
	tx retries:	26
	tx failed:	1
	rx drop misc:	4
	signal:  	-69 [-69, -71] dBm
	signal avg:	-66 [-66, -68] dBm
	Toffset:	6797824060 us
	tx bitrate:	351.0 MBit/s VHT-MCS 4 80MHz VHT-NSS 2
	rx bitrate:	263.3 MBit/s VHT-MCS 6 80MHz VHT-NSS 1
	rx duration:	26267 us
	last ack signal:0 dBm
	expected throughput:	60.333Mbps
	mesh llid:	0
	mesh plid:	0
	mesh plink:	ESTAB
	mesh local PS mode:	ACTIVE
	mesh peer PS mode:	ACTIVE
	mesh non-peer PS mode:	ACTIVE
	authorized:	yes
	authenticated:	yes
	associated:	yes
	preamble:	long
	WMM/WME:	yes
	MFP:		yes
	TDLS peer:	no
	DTIM period:	2
	beacon interval:100
	connected time:	6559 seconds
Now we should see our mesh neighbor with batctl.
root@EX3700:~# batctl o
[B.A.T.M.A.N. adv openwrt-2019.2-5, MainIF/MAC: mesh0/3c:37:86:60:f7:1e (bat0/96:e1:f8:8e:fc:d7 BATMAN_IV)]
   Originator        last-seen (#/255) Nexthop           [outgoingIF]
 * b0:be:76:e9:90:ab    0.420s   (255) b0:be:76:e9:90:ab [     mesh0]
If we want to know how much throughput we can expect, we can run a throughput test with batctl as well. We will use the MAC address from our neighbor.
root@EX3700:~# batctl tp b0:be:76:e9:90:ab
Test duration 10430ms.
Sent 58511592 Bytes.
Throughput: 5.35 MB/s (44.88 Mbps)
Putting things up for a test (Layer 3)
Finally, we can send a regular ping to see if layer 3 is fine as well.
root@EX3700:~# ping -c 3 192.168.28.1
PING 192.168.28.1 (192.168.28.1): 56 data bytes
64 bytes from 192.168.28.1: seq=0 ttl=64 time=1.540 ms
64 bytes from 192.168.28.1: seq=1 ttl=64 time=2.160 ms
64 bytes from 192.168.28.1: seq=2 ttl=64 time=1.240 ms

--- 192.168.28.1 ping statistics ---
3 packets transmitted, 3 packets received, 0% packet loss
round-trip min/avg/max = 1.240/1.646/2.160 ms
Summary
Beyond that point you should connect to the 24TEST wifi with your mobile phone and check that things are working fine there, too.
Other than that mesh with 802.11s only starts to make sense with 3 devices and more, so while our little test setup is a nice POC, fun doesn’t begin until many more devices (2- or 3-digit numbers of devices). That said, the list of neighbors with the following command can become much (much) longer:
root@EX3700:~# batctl n
[B.A.T.M.A.N. adv openwrt-2019.2-5, MainIF/MAC: mesh0/3c:37:86:60:f7:1e (bat0/96:e1:f8:8e:fc:d7 BATMAN_IV)]
IF             Neighbor              last-seen
        mesh0	  b0:be:76:e9:90:ab    0.570s