
This post will explain how to setup a total of 6 jails distributed over 2 hosts, so that DHCP, DNS and LDAP can be provided into the network.
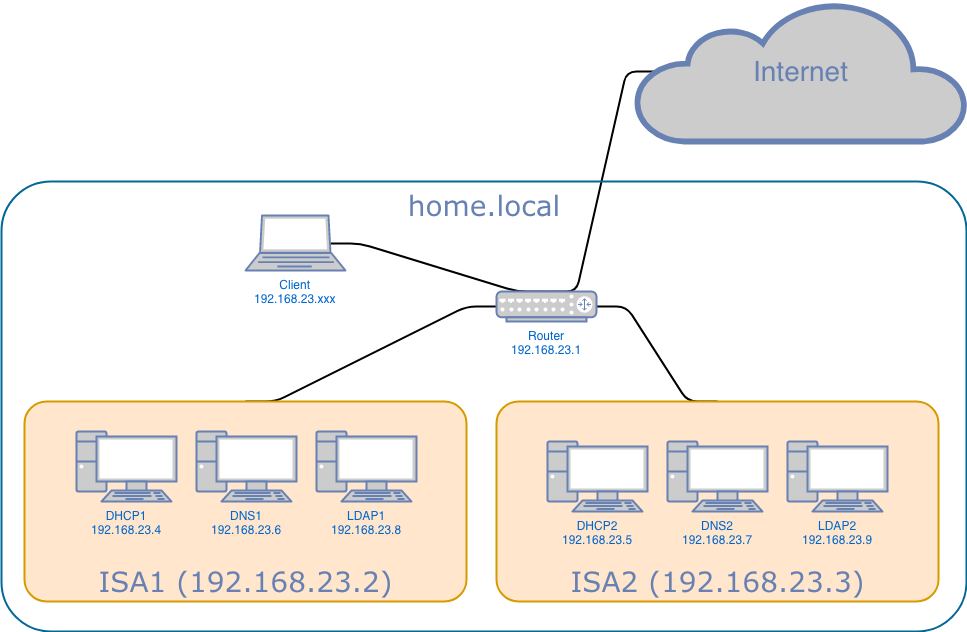
What we’d like to setup are the following servers:
Of course in an ideal world all 6 servers would be sitting on physically dispersed hardware for good load balancing. However, in our case we will use only 2 physical servers and setup 3 jails in each of server. For now we will use “regular” servers, but later want to run our setup on a single board computer such as a raspberry pi. In this post we will talk about the setup process of either of the “ISA” hosts.
ISA Host Network
First of all we need to get our network setup straight. In our example the infrastructure service appliance will be called isa1 and to the outside world have an ip address of 192.168.23.2/24 (which you can change for your configuration). We edit /etc/resolv.conf to look like this:
search          home.local
nameserver      192.168.23.1
nameserver      8.8.8.8
In the /etc/hosts file we need to put the following:
::1                     localhost isa1.home.local
127.0.0.1               localhost isa1.home.local
Next we will actually create multiple aliases for our network interface to be used by the jails later on. Every jail needs one loopback adapter and one public ip address. On top of that our router sits at 192.168.23.1/24 and we have to put that into /etc/rc.conf as well. Also, we will enable services for sshd and openntpd (openntpd being told to synchronize upon start). We will automatically start ezjail and tell the kernel to produce and persist a core dump in case of software exceptions.
ifconfig_em0="inet 192.168.23.2/24"
ifconfig_em0_alias0="inet 192.168.23.4/32"
ifconfig_em0_alias1="inet 192.168.23.6/32"
ifconfig_em0_alias2="inet 192.168.23.8/32"
defaultrouter="192.168.23.1"
cloned_interfaces="${cloned_interfaces} lo1"
cloned_interfaces="${cloned_interfaces} lo2"
cloned_interfaces="${cloned_interfaces} lo3"
sshd_enable="YES"
#ntpd_enable="YES"
#ntpd_sync_on_start="YES"
openntpd_enable="YES"
openntpd_flags="-s -v"
ezjail_enable="YES"
dumpdev="AUTO"
The network configuration we just put into /etc/rc.conf will not apply unless we reboot. As we don’t need (neither want) to do that, we can make the network adjustments ad-hoc by issuing the following commands in the shell:
service netif cloneup lo1
service netif cloneup lo2
service netif cloneup lo3
ifconfig em0 inet 192.168.23.2/24
ifconfig em0 alias0 inet 192.168.23.4/32
ifconfig em0 alias1 inet 192.168.23.6/32
ifconfig em0 alias2 inet 192.168.23.8/32
Finally we should make sure our log files and everything else relates to our time zone. Let’s execute the following to set our timezone:
tzsetup Europe/Berlin
DHCP jail
Obviously the first command that we need is for creation of the actual jail. We use ezjail and call our jail dhcpjail. We assign network interface em0 with ip address 192.168.23.4 to the outside world and use loopback adapter lo1 with ip 127.0.4.1 internally.
ezjail-admin create dhcpjail 'em0|192.168.23.4,lo1|127.0.4.1'
There is something really special about the jail or DHCP – it needs the bpf (Berkley Packet Filter) device the UDP broadcast messaging. Jails are not just a chroot-ed environment but also are restricted heavily in the resources they can use, especially the device file system (devfs) is not fully exposed. That being said, in this case we need to create a ruleset allowing bpf for our jail, so please make sure your /etc/devfs.rules file contains these lines:
[devfsrules_jail_with_bpf=6]
add include $devfsrules_hide_all
add include $devfsrules_unhide_basic
add include $devfsrules_unhide_login
add path 'bpf*' unhide
Above ruleset now shall be applied to our DHCP jail. We have to put the following lines into /usr/local/etc/ezjail/dhcpjail:
export jail_dhcpjail_devfs_ruleset="6"
export jail_dhcpjail_parameters="allow.raw_sockets allow.sysvipc"
Next we will copy our /etc/resolv.conf file into the new jail:
cp /etc/resolv.conf /usr/jails/dhcpjail/etc/
And finally we need to finetune the hosts file in the jail. Please make sure to edit the hosts file in the jail (/usr/jails/dhcpjail/etc/hosts) and not the hosts file of your host environment.
::1                     localhost dhcp1.home.local
127.0.4.1               localhost dhcp1.home.local
Last but not least – and if desired, we can start the loopback interface associated with the jail. We don’t have to do that now, but need to do it before we start the jail (note: if you reboot between now and the time you start the jail, you can skip this step, as the interface will be started as part of parsing /etc/rc.conf during boot).
service netif start lo1
DNS jail
We assign network interface em0 with ip address 192.168.23.6 to the outside world and use loopback adapter lo2 with ip 127.0.6.1 internally.
ezjail-admin create dnsjail 'em0|192.168.23.6,lo2|127.0.6.1'
Next we will copy our /etc/resolv.conf file into the new jail:
cp /etc/resolv.conf /usr/jails/dnsjail/etc/
We finetune the hosts file in the jail.
::1                     localhost dns1.home.local
127.0.6.1               localhost dns1.home.local
Again – optinally, we can start the loopback interface associated with the jail.
service netif start lo2
LDAP jail
We assign network interface em0 with ip address 192.168.23.8 to the outside world and use loopback adapter lo3 with ip 127.0.8.1 internally.
ezjail-admin create ldapjail 'em0|192.168.23.8,lo3|127.0.8.1'
Next we will copy our /etc/resolv.conf file into the new jail:
cp /etc/resolv.conf /usr/jails/ldapjail/etc/
We finetune the hosts file inside the jail.
::1                     localhost ldap1.home.local
127.0.8.1               localhost ldap1.home.local
Again – optinally, we can start the loopback interface associated with the jail.
service netif start lo3
check
Last but not least you want to start all three jails and check that they are running. Please run the following four commands:
ezjail-admin start dhcpjail
ezjail-admin start dnsjail
ezjail-admin start ldapjail
ezjail-admin list
Especially the last command will give you the output we’re looking for. It will list the jails that are installed and their status.
STA JID  IP              Hostname                       Root Directory
--- ---- --------------- ------------------------------ ------------------------
DR  3    192.168.23.8    ldapjail                       /usr/jails/ldapjail
    3    lo3|127.0.8.1
DR  2    192.168.23.6    dnsjail                        /usr/jails/dnsjail
    2    lo2|127.0.6.1
DR  1    192.168.23.4    dhcpjail                       /usr/jails/dhcpjail
    1    lo1|127.0.4.1
DHCP2, DNS2 and LDAP2 jail on ISA2
As you might have guessed, the setup is exactly the same. The only difference are the ip addresses. You can see the ip addresses in the figure up top this article.